
Dokumentation modified Shop Plugin
Kompatibel mit: 2.0.x
Checkliste
Folgende Schritte sind notwendig um die Micropayment Zahlmodule zu implementieren. Alle Details zur Integration finden Sie im weiteren Verlauf dieser Anleitung.
- 1
Melden Sie sich kostenlos und unverbindlich im Micropayment-ControlCenter an.
- 2
Legen Sie im Micropayment-Händlerzugang Ihr/e Projekt/e unter
Konfiguration → Projekte
an. Die angemeldeten Projekte werden von unserem Risk-Team schnellstmöglich überprüft. - 3
Aktivieren Sie Ihr Projekt. Nachdem Sie alle Einstellungen vorgenommen haben, sind alle Zahlungsarten im Testmodus verfügbar.
- 4
Beantragen Sie die benötigten Zahlungsarten unter
Kundendaten → Vertragsinformationen → Zahlungsarten. - 5
Konfigurieren Sie die gewünschten Zahlungsarten unter
Konfiguration → Zahlungsarten. - 6
Nach der Legitimation des Accounts steht Ihnen unser Service vollumfänglich für den LIVE-Betrieb zur Verfügung
Sie haben jederzeit die Möglichkeit, alle Zahlarten im Testmodus zu nutzen. Sollten Sie dazu Fragen haben, steht Ihnen unser Support-Team jederzeit zur Verfügung
Installation
Für die Installation der Bezahlmodule benötigen Sie Zugriff auf die Dateien der Shopsoftware.
Üblicherweise loggen Sie sich hierfür per FTP auf Ihrem Server ein.
Installationsbeginn:
Entpacken Sie das Modul und legen Sie es per FTP auf dem Shopserver ins Hauptverzeichnis ab.
Das Micropayment-Plugin kann direkt über das Modified Backend installiert werden.
- 1
Login über das Modified-Admin-Backend
- 2
Module → Zahlungsoptionen → Zahlungsarten wählen
- 3
Sobald das Plugin installiert wurde, müssen Sie dieses noch Bearbeiten.


Konfiguration der Zahlungsarten im Modified Backend
Login über das Admin-Backend → Module → Zahlungsoptionen → Installieren und Bearbeiten für jede Zahlungsart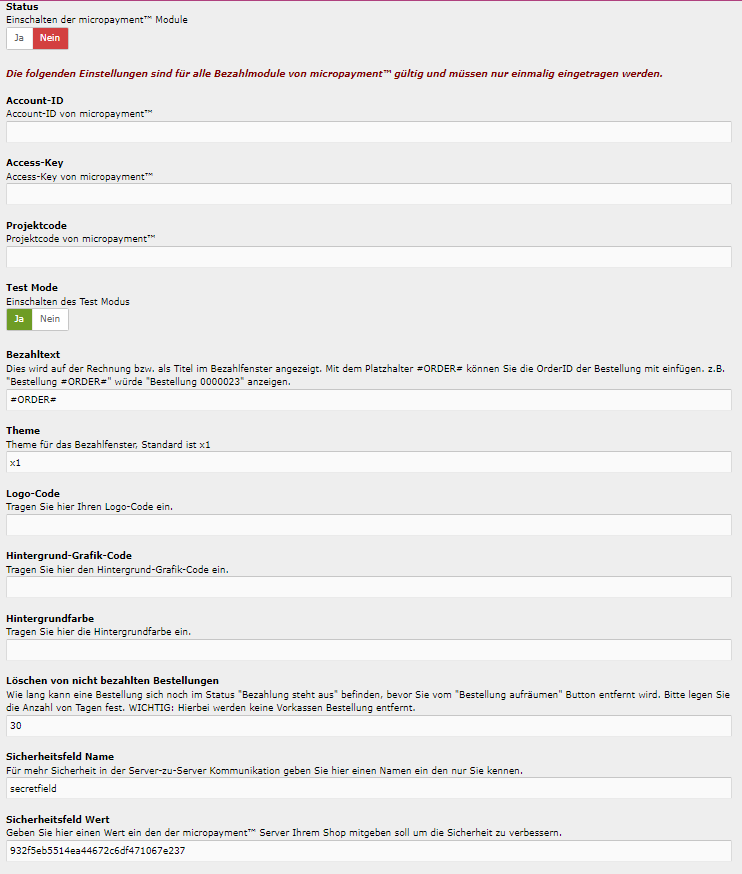
Einstellungen der einzelnen Felder in der Micropayment-Konfigurationsmaske:
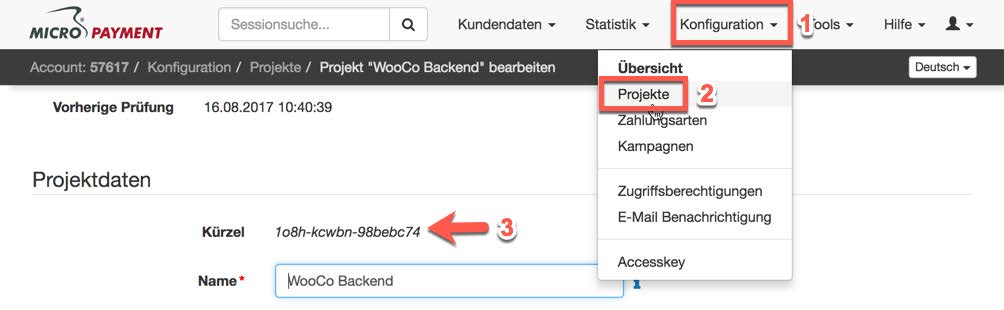
Projekt Kürzel (ID)
Rufen Sie im Micropayment Controlcenter unter Konfiguration → Projekte das Projekt auf und kopieren Sie das dort angegebene Kürzel.
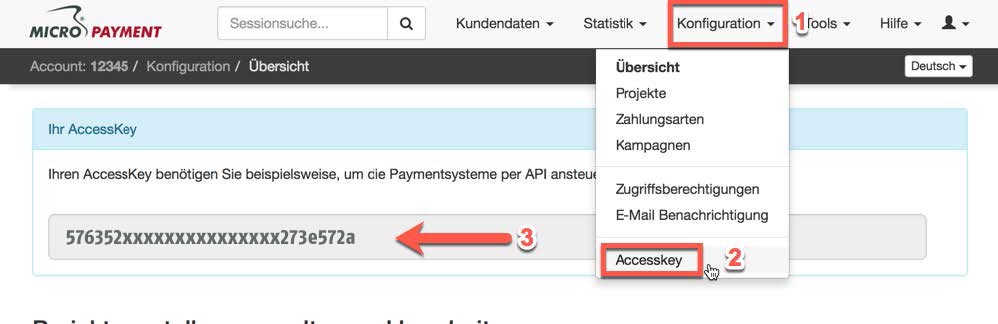
Accesskey
Dieser ist im Micropayment Controlcenter unter Konfiguration → Accesskey zu finden.
Test Modus
Aktiviert bzw. deaktiviert den Testmodus
Freitext / Bezahltext
Verwendungszweck der Buchung. Wenn leer, wird nur die Bestellnummer [orderId] genutzt. Optional kann ein eigener Text hinzugefügt werden. Beispiel: #Order#.
Theme Template
Es stehen die Themes X1 (default) oder X2 für die Darstellung bei Weiterleitungen zur Verfügung. Mehr Informationen über die Themes finden Sie im Micropayment Controlcenter unter Hilfe → Bezahlfenster & Themes
Micropayment Domain
wählen Sie hier je nach Ihrer Micropayment Account Nummer 0-49999 die Micropayment GmbH (.de) bzw. ab 50000-99999 die Micropayment AG (.ch) aus
Logo im Zahlfenster
Sie können im Micropayment Controlcenter (Tools → Bezahlfenster-Grafiken) eigene Logos (nur Theme X1) hinterlegen und den gfx-Code hier angeben.
Hintergrund Farbe
Hier tragen Sie ggf. einen abweichenden Farbcode (Hex-Wert) ein. Mehr Informationen finden Sie im Micropayment Controlcenter unter
Hilfe → Hintergrundgrafik
Hintergrundgrafik
Hier legen Sie die Hintergrundgrafik bei Weiterleitungen fest. Mehr Informationen finden Sie im Micropayment Controlcenter unter
Hilfe → Hintergrundgrafik
Geheimwort / Sicherheitsfeld
Das secretfield finden Sie im Micropayment Controlcenter unter
Konfiguration → Zahlungsarten → Zahlungsart Event → Projekt-konfigurieren → Parameter: Benachrichtigungs-URL → Option bearbeiten
Aktivieren/Deaktivieren
Aktivieren Sie die Zahlungsart im Shop Backend unter der Zahlart und den Status.
Zahlartenkonfiguration im Micropayment Controlcenter
Kreditkarte / SEPA Lastschrift / Vorkasse
Micropayment - Projekteinstellungen
Bevor Sie das Payment-Plugin von Micropayment nutzen können, müssen noch einige Einstellungen im Micropayment Controlcenter vorgenommen werden.
Hinweis:
Einstellungen müssen für alle Zahlungsarten vorgenommen werden, die Sie verwenden möchten. Die Konfiguration für Kreditkarte, SEPA Lastschrift und Vorkasse unterscheidet sich von den weiteren Zahlarten.
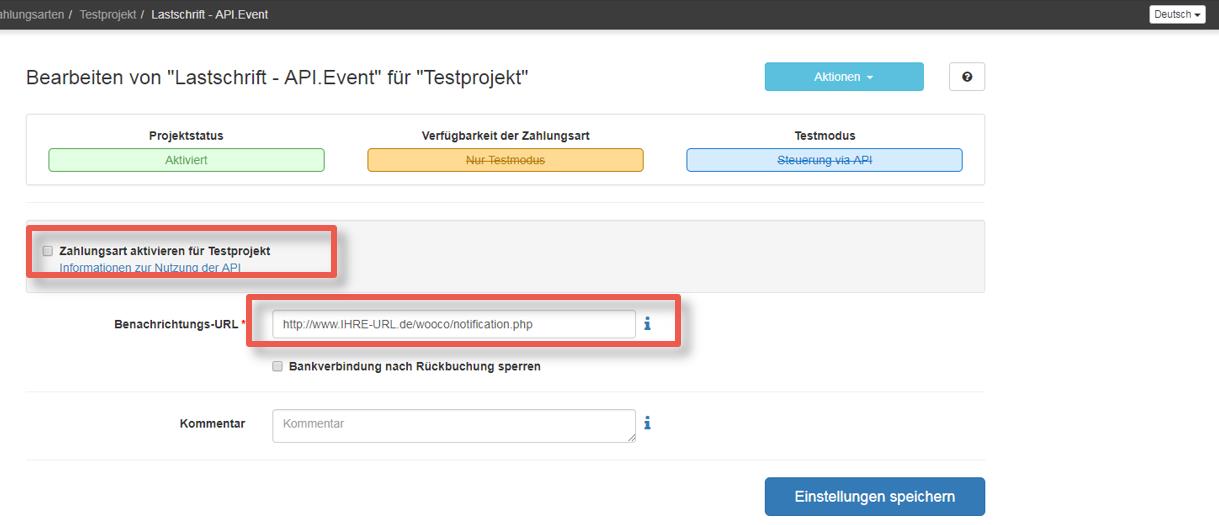
Zahlungsart konfigurieren:
Rufen Sie unter Konfiguration → Zahlarten die jeweilige Zahlart auf Kreditkarte → API.Event / Lastschrift → API.Event / Vorkasse → API.Event.

Benachrichtigungs-URL:
Tragen Sie hier folgende Benachrichtigungs-URL ein:
Lastschrift
https://www.shopurl.de/root-of-shop/ Kreditkarte
https://www.shopurl.de/root-of-shop/ Vorkasse
https://www.shopurl.de/root-of-shop/ Aktivieren Sie die Zahlungsart
Klicken Sie hierzu auf "Informationen zur Nutzung der API" und stimmen Sie den Informationen zu. Speichern Sie die Einstellungen.
Zugriffsberechtigung
Geben Sie den Zugriff zur Kommunikation zwischen Ihrem Shop und Micropayment frei. Gehen Sie dazu auf Konfiguration → Zugriffsberechtigungen und anschließend auf neue Zugriffsberechtigung. Tragen Sie hier die IP-Adresse Ihres Shop-Servers ein.

Zahlungsarten
Grundsätzlich müssen alle Zahlungsarten, die Sie im Shop verwenden möchten, konfiguriert und aktiviert werden. Wählen Sie bitte bei den weiteren Zahlungsarten die Event Option aus (z.B. SOFORT. - Event, paysafecard - Event etc.).

Aktivieren Sie die von Ihnen gewünschte Zahlungsart
Hinterlegen Sie als API-URL Ihre Shop URL: https://shopurl.de/callback/micropayment/notification.php?MODsid=__$MODsid__&orderid=__$orderid__
Unter "Parameter: Benachrichtigungs-URL" hinterlegen Sie bitte folgende Werte für diese Zahlungsarten.
| Name | Wert | |
|---|---|---|
| orderid | = | __$orderid__ |
| MODsid | = | __$MODsid__ |
| Name | Wert | |
|---|---|---|
| orderid | = | __$orderid__ |
| MODsid | = | __$MODsid__ |
| Name | Wert | |
|---|---|---|
| orderid | = | __$orderid__ |
| MODsid | = | __$MODsid__ |
| Name | Wert | |
|---|---|---|
| orderid | = | __$orderid__ |
| MODsid | = | __$MODsid__ |
| Name | Wert | |
|---|---|---|
| orderid | = | __$orderid__ |
| MODsid | = | __$MODsid__ |
| Name | Wert | |
|---|---|---|
| orderid | = | __$orderid__ |
| MODsid | = | __$MODsid__ |
| Name | Wert | |
|---|---|---|
| orderid | = | __$orderid__ |
| MODsid | = | __$MODsid__ |
Optionen → API-URL: Aktivieren Sie hier das Senden zusätzlicher Daten.
Erweiterte Sicherheit: Aktivieren Sie diese Option.
Testmodus: Aktivieren / Deaktivieren - muss aktiviert sein, falls Sie in Ihrem Shop-Modul Testbestellungen durchführen wollen. Zugehörige Test-Daten können Sie aus dem Micropayment Controlcenter unter Hilfe → Testmodus entnehmen.
https://www.shopurl.de/ Die Konfiguration im Micropayment Controlcenter ist nun abgeschlossen.
Wir wünschen Ihnen viel Spaß mit Ihrem Micropayment-Plugin.
Allgemeine Hinweise
Die Bezahlung über die Micropayment-Module können in der Währung € (EUR) durchgeführt werden. Sollten Sie eine andere Währung in Ihrem Shop anbieten, so wird dieser Wert umgerechnet, bzw. für die Kreditkarte, muss ein Währungsterminal beantragt werden.
Bezahlstatus: Initiated payment with Micropayment
Der Kunde hat eine Bestellung ausgelöst. Eine Bestellung kann diesen Status dauerhaft besitzen falls der Kunde die Payment Fenster verlässt und keinen vollständigen Bezahlprozess durchläuft.
Bezahlstatus: Prepayment, outstanding. Deadline till Jahr-Monat-Tag
Bestellung wurde mit Vorkasse durchgeführt. Diese wird angegeben sofern keine Bezahlungseingang vorhanden ist bei eine Vorkassen Bestellung. Angegeben Datum erläutert wann die Vorkassen Bestellung verfällt.
Bezahlstatus: Payment complete. 00.00 EUR Auth xxxxxxxxxxxxxx
Bestellung wurde bezahlt. Angegeben wird Zahlbetrag und die Interne Micropayment Auth Schlüssel. Dies kann verwendet werden im ControlCenter um die Zahlung zu bearbeiten.
Bezahlmodule für weitere Shops finden Sie auf unserer Seite unter Payment Plugins für Ihren Online Shop
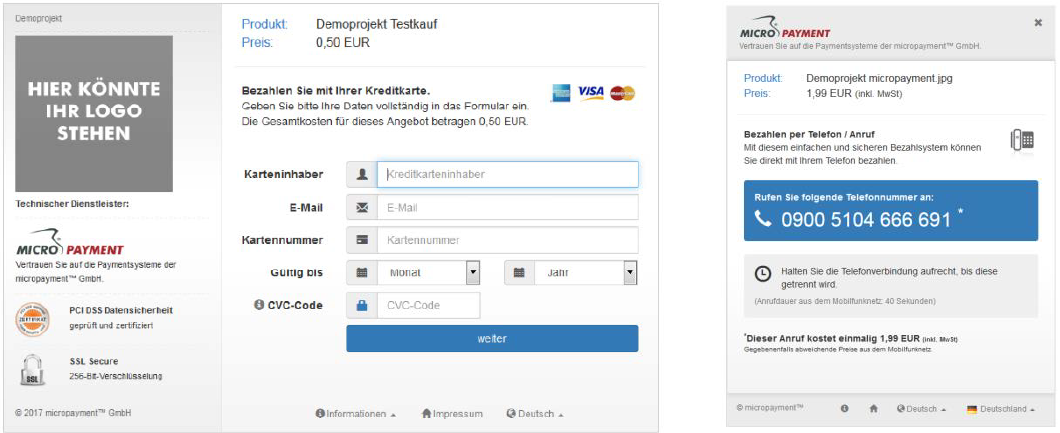
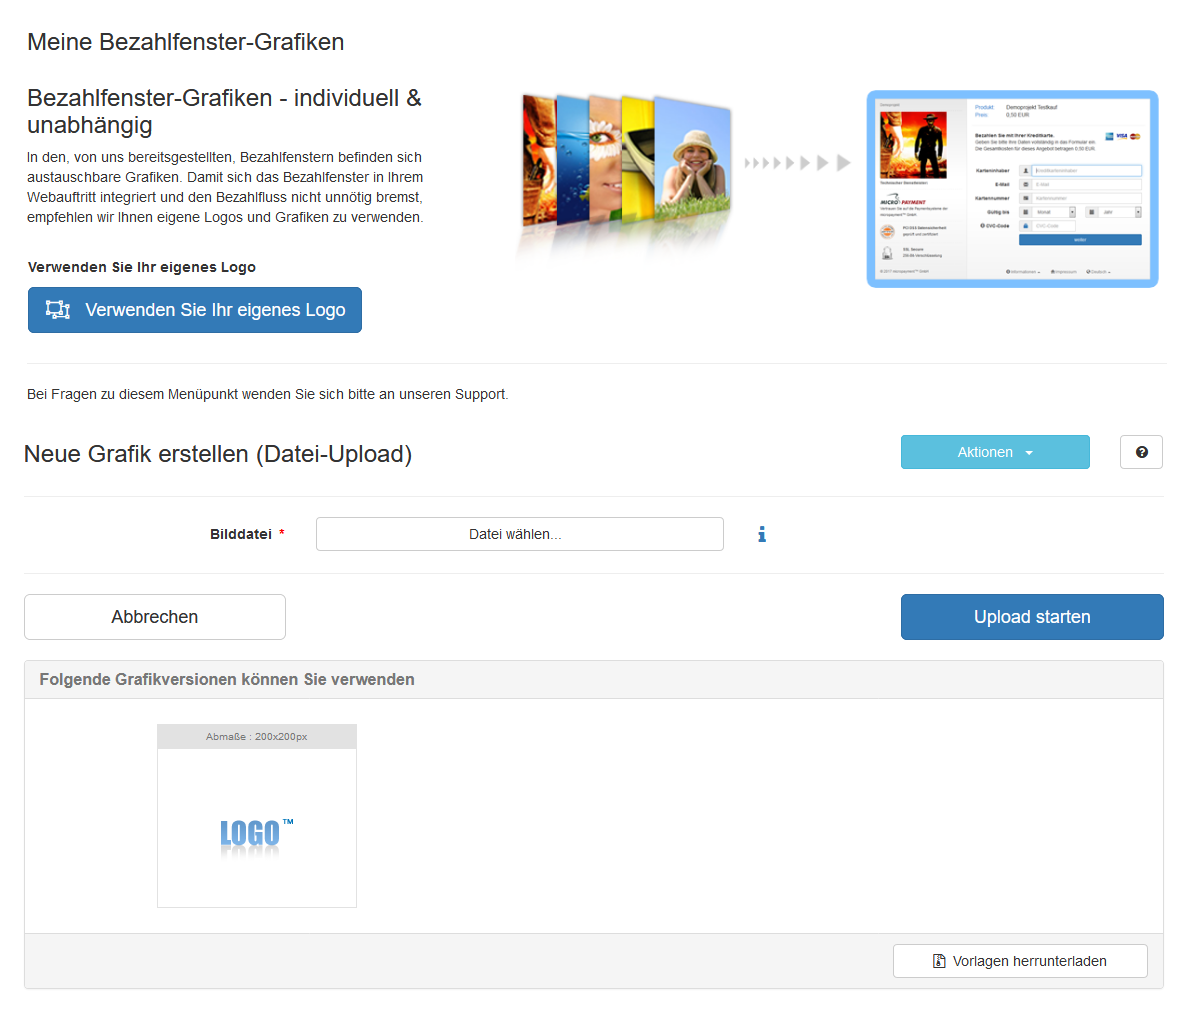
Individuelle Grafik für Ihr Bezahlfenster
Sie haben die Möglichkeit, im Bezahlfenster von Micropayment eine individuelle Grafik mit der Größe 200x200px zu hinterlegen. Diese Grafik wird mittels Grafik-Code aufgerufen. In Ihrem Micropayment ControlCenter können Sie diese unter dem Menüpunkt „Tools – Bezahlfenster-Grafiken hochladen. Der generierte Code (Kürzel) wird im folgenden Schritt in Ihrer Konfiguration als Grafik-Code hinterlegt.
Integration leicht gemacht.
Sie haben Fragen zu unseren Zahlungsmitteln oder zur Verwendung unserer Systeme? Schreiben Sie uns bequem per E-Mail. Wir werden Ihnen schnellstmöglich antworten.
(0800) 5 770 371
kostenfrei aus dem deutschen Festnetz
-
 helpdesk
Carsten Keßel
senior support engineer
-
 helpdesk
Robert Kühn
senior support engineer